How does windscreen chip repair work?
All about the art of chip repair
One of New Zealand’s biggest source of claims against vehicle insurance is problems with windscreens. Car windshield cracks and chips will happen to most people at least once during their driving years – fortunately repairs are often possible, provided that procrastination hasn’t taken the damage beyond the point of repair.
Have you ever wondered exactly what happens to your windscreen during its repair? This article is about satisfying your curiosity, for the many readers to might have wondered about the techniques and processes behind making your windshield look great again.
Examination of the Chip
During the examination stage we determine the appropriate repair method we’ll use to fix your windscreen. The method depends on the size and type of chip damage, which also determines if repair is indeed possible. We’ll now cover the major types of damage:
Bullseye
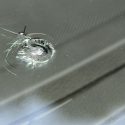
Some chips have circular shapes with a dark outline and a central point of impact with a cone in the outer layer of glass – making it resemble the bullseye of a dartboard. Fortunately, Bull’s-eye chips are often repairable provided the diameter is within a certain limit (roughly an inch in diameter) and isn’t within the driver’s field of vision.
Half Moon (partial bull’s eye)
The half-moon crack is in a semi-circular shape, a partially-formed full bull’s eye crack.
Surface Chip or Pit
Probably the most common type of windscreen damage, chips occur when small hard objects such as stones knock out a small chunk of glass. A key to this type of chip (and whether filling will be possible) is whether the object didn’t pierce the plastic divider between the inner and outer layers of safety glass.
Star
When damage takes the form of several cracks spreading outwards from the point of impact, it gives the effect of looking like a star. A diameter of approximately 3 inches is the general rule for considering repairability.
Crack
If a crack starts within 2 inches of the edge of the windshielf it is known as an edge crack (these are the most common type of cracks), and all other cracks are known as floater cracks. Stress cracks are those that occur when factors other than hard object impact causes the crack, such as vibrations. As a general guide, cracks less than 8 inches in length can be repairable.
Combination
Combination breaks are when damage includes a central chip with cracks coming out from it. As a general rule, combination cracks are often repairable if the chip’s core body is less than 2 inches in diameter.
The Windshield Repair Process
Repair work will begin once your crack or chip meets the criteria to be able to be repaired (i.e. is within our size standards and technician is happy that the result will be of a high standard).
1. Cleaning out of the impact point
Cleaning of the chip is an important first stage to ensure a successful repair. Loose glass splinters and fragments are removed with sharp scraping tools. At this stage a skilled autoglass repair technician will identify opportunities to enhance later resin flow by extending cracks to join them up with adjacent cracks through the application of light pressure.
2. Making a vacuum seal
After cleaning and preparation, the tool for making the repair is applied to the windscreen. Suction is used to secure the applicator to the windshield and it is filled with the correct amount of resin to be used. Care is taken to prevent any air from remaining in the crack – this can affect the curing of the resin.
3. Fill crack with resin
The resin is pushed into the crack after the air has been removed from it. The time taken at this step is determined by the size of the crack and resin type used, eventually pressure from the applicator will ensure the clear liquid resin flows throughout the whole crack.
4. Resin Cure
Unlike many other bonding agents, windscreen repair resin cures by exposure to Ultra Violet light, hardening and causing the crack to firm up. At this stage, care is taken to ensure all resin is cured, including that around the edges of the repair, outside of the applicator’s coverage. This means full repair integrity is upheld.
5. Filling pits/chips
A chip or pit often means there is more resin needed than with a crack, because a small chunk of the windscreen is missing and needs to be replaced by resin. This type of repair often is assisted by clear tape to hold the pit resin in place.
6. Curing the resin
When all filling is complete, UV light can be applied to cure the resin and cause it to harden. UV light can come from natural sunlight as well as UV lamps.
7. Last step – Levelling off excess resin
A smooth finish is necessary to allow for normal window wiper operation. A razor blade is used to achieve a perfect finish.